


Last night, the family got together at my parents' house to celebrate my dad and Aunt Ann's birthdays. Of course, it was fun, as always, because my mother and aunts are a special breed of hilariously smart, witty, sarcastic women. They're the kind of people that everyone loves, especially younger generations who always seem to be in awe of parental figures who are actually laid-back and comical. At every event, they spend hours relating stories from work, friends, family, and their childhoods. I always feel like a kid at story-time, sitting there, listening intently on the edge of my seat. They're not afraid to be completely blunt or inappropriate either--in a way that isn't uncomfortable, but fills you with laughter. And they have so many tales to tell, you almost never hear the same one twice. If you do, though, it's just as funny the second time around.
On top of that, they're all wonderful cooks. No matter the reason for a get together, there's always way too much food than can be eaten; leftovers abound! This includes dessert, which can add up to more than seven, full-sized dishes for just the 13 of us. Almost everyone takes a piece from multiple desserts too because you just can't pass that stuff up...cakes, pies, cheesecakes, trifles, tiramisu, cookies, cannolis...you just have to have a little bit of everything.
For Dad and Aunt Ann, we had three desserts. My mom made what seems to be a new tradition--a chocolate cake covered in half chocolate frosting, half Aunt Ann's buttercream with coconut. It's really the perfect combination because at least one side will satisfy everyone in the family; Billy, in fact, likes his slice to fall on both sides of the line, so that he gets chocolate cake and coconut cake, all in one piece. He actually just devoured a giant section a couple nights ago, big enough for two people.


My Aunt Ann made a chocolate cheesecake (courtesy of Junior's Cheesecake), perched atop a thin layer of spongecake, covered in chocolate ganache and chopped candy bars (we're talking Reese's cups, Kit Kats, Peppermint Patties, Hershey's cookies & cream, and more). This thing looked astounding. Nobody would ever suspect it was homemade! Considering my obsession with great food, I am definitely lucky to have family members with such talent.


The third dessert was a Halloween-themed chocolate salted caramel tart that I made for my aunt (as is the tradition, four years running!). I used polenta shortbread as the crust, spread a layer of melted, bittersweet chocolate over it, filled it with a chocolate batter to bake, then topped with a salty, buttery caramel. For the finishing touches, I laid onto it a spun sugar web with a giant, chocolate spider. For my first time designing anything out of spun sugar, I did a pretty decent job too! There were some screwed up areas, but the spider, which my mom made, did a fine job of hiding them ;)


We even got some homemade peanut brittle out of the leftover sugar. I've been eating little bits of it all week as part of my nightly, Halloween dessert. Of course, this week I have not only that but some of the chocolate tart, cheesecake, and chocolate covered strawberries that Billy gave me for Sweetest Day...I don't plan to weigh myself at the end of this month, in case anyone wondered ;)


Now, in this entry, I'm posting the recipe for my chocolate tart, which I highly recommend. It's actually quite easy considering all the separate items that have to be made. The original recipe is simply the crust and chocolate filling, so you could make just that! It really is delicious all on its own that way. I'm going to make another post with the recipe for my aunt's candy bar cheesecake, though...whenever she finally emails it to me!
Remember, you don't need to include every single step of this tart. The original recipe is simply the crust and chocolate filling, no layer of melted chocolate, caramel, or spun sugar. It's quick and it's easy, which makes it perfect, in my mind. On its own, it's also pretty addictive. With the caramel, the tart becomes more like a candy bar, super sweet and rich. So, you choose how far you want to take it!
No matter what, make sure the filling is made with the best quality chocolate because this is the main feature. I used E. Guittard bittersweet chocolate, which I got at Sur la Table. It's more expensive than a bag of Ghirardelli, but well worth it! I could eat the entire box plain.
No matter what, make sure the filling is made with the best quality chocolate because this is the main feature. I used E. Guittard bittersweet chocolate, which I got at Sur la Table. It's more expensive than a bag of Ghirardelli, but well worth it! I could eat the entire box plain.
Polenta Tart Crust
Ingredients
- 1 1/4 cups unbleached all-purpose flour
- 1/2 cup instant or fine polenta
- 3/4 cup sugar
- 1 tsp kosher salt
- 1/2 cup (1 stick) unsalted butter, cold, cut into 1/4" cubes
- 1 large egg
- 2 tbsp extra-virgin olive oil (don't be afraid of this either, you won't notice it)
- 1 tsp pure vanilla extract
- a 10" tart pan with fluted sides and a removable bottom
Directions
Place the flour, polenta, sugar, and salt into the bowl of a food processor and pulse to combine. Add the butter and pulse until the mixture resembles coarse sand and no large lumps of butter are visible. Remember, this is more like a shortbread crust, not pie pastry, in which you would want lumps of butter to add flakiness.
In a small bowl, whisk together the egg, olive oil, and vanilla. Add to the food processor and pulse just until a ball of dough forms. Remove this and form it into a round disk, wrap tightly in plastic, and chill until firm enough to roll--at least 1 to 2 hours.
On a flat, floured surface, roll the tart dough into an 11" circle, 1/8-inch thick. Transfer the dough to the tart pan by rolling it around the rolling pin, like a carpet, and unrolling it over the pan. Press the dough into the bottom and sides of the pan, trimming the top so it's flush. Chill while you make the filling.
Before this recipe, I'd never made anything like this. I chilled my dough somewhere between one and two hours and found that it cracked apart along the edges as I rolled and would fall apart completely when I tried to pick it up to place in the tart pan. I have absolutely no idea what was causing this, but if it happens to you, don't worry! I simply mended the cracks, used a giant spatula to transfer it to the tart pan, and then mended any broken off pieces once it was set inside.
If you plan to spread chocolate in the bottom, melt maybe a handful of chocolate and quickly spread it evenly all over the bottom of the tart shell. You have to move quickly because the dough is cold and the chocolate will set.

Chocolate Filling
Ingredients
- 4 oz bittersweet chocolate (the absolute best! Splurge when it's appropriate)
- 1/2 cup (1 stick) unsalted butter, softened
- 2 large eggs
- 1/2 cup granulated sugar
- pinch of kosher salt
- 1 tsp pure vanilla extract
- 3 tbsp instant or fine polenta
- 1 tbsp unbleached all-purpose flour
Directions
Preheat oven to 350 degrees and position a rack in the center.
Place the chocolate and butter in a large, heatproof bowl and set over a pan of simmering water (you only need about an inch of water, it shouldn't touch the bottom of the bowl), whisking occasionally to combine. Remove the bowl from the pan and set aside.
Place the eggs, sugar, and salt in the bowl of an electric mixer (or use a hand mixer) fitted with the whisk attachment and beat on high speed until thick and tripled in volume, about 3 minutes. Beat in the vanilla extract.
Fold the egg mixture into the chocolate mixture until mostly combined. Sift the polenta and flour over the batter and then continue folding until no streaks appear and the dry ingredients are fully incorporated.

Pour the filling into the prepared shell and place it on the baking sheet in the oven (to catch any drips). Bake for 25 minutes or until the filling is puffed and cracking. Allow the tart to cool at least 20 minutes before carefully removing the sides of the pan.
You can eat it plain, dust the top with confectioners sugar, add a dollop of whipped cream (preferably homemade), or pour caramel over the top (recipe below). It's really good at all temperatures too! Eat it right away (after the 20 minute cooling period) while it's still warm, let it come to room temperature, or eat it straight out of the fridge.

Salted Caramel Topping
Ingredients
- 1 cup granulated sugar
- 1/4 cup water
- 1 tsp fleur de sel or fine sea salt
- 1/2 cup heavy cream
- 4 tsp unsalted butter, cubed
Directions
I'm very detail-oriented...I like people to know exactly what to do, exactly what problems may arise...because when you've never done something before, it's nice to have all your bases covered. By doing this, I think I tend to make some things sound more difficult than they are...more daunting than they should be. And that's exactly what this caramel description will probably look like, but I swear it's so so easy.
A note before starting, though. To make caramel, you boil sugar to a certain stage and then mix heavy cream into it. I'd never had a problem before, but on this occasion, a mass of blazing hot steam shot up from the mixture the second I poured in the cream, burning my entire hand as I tried to stir. To be safe, you should always wear oven mitts during this step.
A note before starting, though. To make caramel, you boil sugar to a certain stage and then mix heavy cream into it. I'd never had a problem before, but on this occasion, a mass of blazing hot steam shot up from the mixture the second I poured in the cream, burning my entire hand as I tried to stir. To be safe, you should always wear oven mitts during this step.

Put the cream and butter in a small bowl--you're going to pour it into the hot sugar mixture, so you want them combined in this way to make it quicker and easier.
Place the sugar and water in a tall, heavy-bottomed saucepan (so it doesn't burn) and bring to a boil over high heat. Continue to cook until amber in color, never stirring. If it appears that one side is becoming a little golden before another side, very gently swirl the pan to mix the two--you need to do this because you don't want one side to cook before the other so that one side ends up burnt and your whole batch is ruined, but you don't want to stir because you can create little crystals of sugar. So, just swirl; it's easy ;)
Place the sugar and water in a tall, heavy-bottomed saucepan (so it doesn't burn) and bring to a boil over high heat. Continue to cook until amber in color, never stirring. If it appears that one side is becoming a little golden before another side, very gently swirl the pan to mix the two--you need to do this because you don't want one side to cook before the other so that one side ends up burnt and your whole batch is ruined, but you don't want to stir because you can create little crystals of sugar. So, just swirl; it's easy ;)
The second the sugar mixture becomes amber, remove it from the heat and pour in the heavy cream and butter, stirring constantly. If you don't incorporate the heavy cream quickly enough, the areas without it will harden like candy and you won't end up with caramel at all. The mixture is also going to bubble up and rise, but it'll go back down as you stir (this is why you want a taller pan). When the mixture is fully incorporated, add the fleur de sel. If you'd like to sprinkle a little over the top of the tart later, just add half the salt to the caramel.
You can use the caramel like a sauce, pouring it warm over slices of the tart, to be served immediately. You can also allow the caramel to set slightly, so that it's quite thick, but still pourable--this way, you can pour it over the tart, but it won't go running down the sides. Then, when you slice it later, you'll have clear layers of chocolate and caramel :)

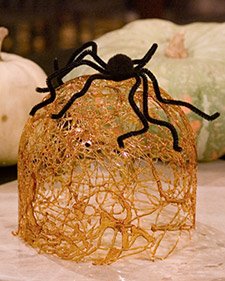
Spun Sugar Spiderweb
Originally, the sugar spiderweb was supposed to be in more of a dome shape, rather than flat. My mom had the idea of making a sugar cage to place over the tart, but I thought it would be even better to make it a spiderweb, since it was supposed to be Halloween-themed. We followed the directions and made a pretty decent web, but it wouldn't pull away from the bowl--I'm guessing we let it sit for too long.

I had previously watched several videos of street vendors, in China, making animals out of spun sugar on a piece of marble, though. They used a gravy spoon to pour out the hot syrup in the desired thickness, moving quickly and fluently to create the most amazing animal figures! So, I thought our best bet would be to replicate that method with a flat spiderweb, which is exactly what I did.
Ingredients
- 2 1/2 cups granulated sugar
- 2/3 cup light corn syrup
- 1/2 cup water
- parchment paper, for creating the web
Directions
Before cooking the sugar, lay a piece of parchment paper on a flat surface and trace a circle on it, the diameter of your tart pan--you'll use this as a guide, ensuring your web isn't too big.
Place the sugar, corn syrup, and water in a 2-quart, heavy-bottomed saucepan. Boil over medium-high heat, never stirring. Keep a candy thermometer immersed in the liquid (not touching the bottom, or you'll get a false reading) and cook until the mixture reaches 311 degrees; this is the hard crack stage.
Immediately remove from the heat and pour into a medium-sized, microwavable glass bowl. If you don't, the sugar will just keep cooking.

This stuff hardens incredibly quickly...and it makes a mess. A giant, massive, fun mess. If you watch a video of the Chinese street vendors, though, you know that it must get better with practice.
Use a gravy spoon to scoop up a spoonful of syrup scraping it multiple times against the edge of the bowl so that it's not dripping everywhere--you want this to be as clean as possible. You probably want to start out slowly making the strings of webbing, but you should move quickly to keep the lines thin. You'll likely get the hang of it fairly quickly. To me, the most difficult part was starting with a thin line--keeping it as thick or thin as I like after the initial pour was easy.
First, draw the straight lines that go through the web from one end of the circle to the other; I drew at least four that intersected in the middle of the web. Then, make the connecting lines, curving downward in the middle (like a u). I started close to the center of the web and gradually made my way to the outside.
You'll need to refill your spoon multiple times, just remember to always scrape it before working on your web. And work as quickly as you can because, you'll see right away, the sugar will be hardening the entire time. Almost the second you lay a line, the sugar will harden--this isn't something you can fix if you make a mistake. I ended up with some horribly thick pieces of webbing, some that were like little pools of sugar, but just hid them with my chocolate spider. There's enough sugar syrup to make another web if your first doesn't work out. I made two and still had leftover syrup :)

You can also re-melt the sugar (to an extent) in the microwave, which is why you want a microwavable bowl. That way, if it's really thickened too much before finishing your web, you're not out of luck.
Once your web is finished, allow it to sit for about five minutes and then very gently and carefully lift it up with the parchment and start to peel the parchment away. It'll come off with no problems, you just don't want to crack the web in your hands! If you're not going to use it right away, keep it in the fridge because the sugar will actually get a bit sticky and soft if it sits at room temperature too long.
When you're ready, gently lift up the web and place it right on top of the tart!
Chocolate Spider
This one's pretty straightforward...
Melt some chocolate in a small bowl and let it cool just slightly, so that it's thick enough to form the pieces of the spider.
Using a spoon, make a round mound of chocolate on top of some parchment paper--make it as big or small as you like! I wanted a huge spider, for effect :) If your mound is seeming a bit flat, just let the chocolate set a bit more, so that it's thicker.
My mom made the spider while I was working on something else, so I didn't see her exact method for the legs. But the gist is that you form the legs separate from the spider, giving them a little bend in the middle so that, when attached, they extend upward from its body and then back down--just like a real spider! When the legs are all formed, let them set completely before trying to remove them. You'll probably want to put them in the fridge to ensure the chocolate is solid. Even better, you could put it all in the freezer!
For actually forming the legs, I imagine (since the chocolate is thick) you can use a toothpick to scoop up small mounds of it and draw the legs onto the parchment. You could also pipe them, just make sure the hole isn't too large so that you have super thick spider legs.
When the legs are definitely solid, very carefully peel the parchment away from each one. To attach, just use a bit of melted chocolate like glue; when it sets back up, the legs will be fully attached to the spider body.


To make eyes, you can do any number of things...make a bit of thick white icing and dot them on...use tiny silver dragees (just prepare to break your teeth because those things are hard!)...do anything you can think of...or just leave it without.
Once the entire spider is set, legs and all, simply lift it up from the parchment and set it on top of your web-topped tart!


No comments:
Post a Comment